Revon Elite Standing Desk Unboxing — Assembly Made Easy!

Today, we’re unboxing the Revon Elite, walking you through every step of the setup, and exploring the DivMag accessories that complete the system.
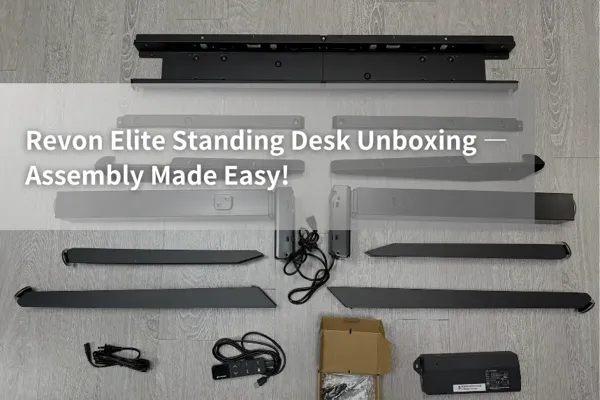
Table of Contents
We’ve been waiting for this one — the Revon Series electric standing desks are finally here!
Today, we’re unboxing the Revon Elite, walking you through every step of the setup, and exploring the DivMag accessories that complete the system. If you’ve ever wondered how easy it is to assemble a Dezctop standing desk or what makes the Revon Series special, this post is for you.
1. Unboxing the Revon Elite Frame

The Revon Elite comes in two boxes — one for the desk frame and one for the desktop. Both are quite heavy, so if you plan to move them upstairs, make sure you have some help (or be ready for a mini workout!).

The frame box features a small cut-out corner, it is a thoughtful touch that makes it easier to lift the flap.

Inside, every component is neatly packed and protected. Just a heads-up: the main lifting legs are really heavy, so handle them with care.

Ta-Dah~ Everything’s out of the box and organized. Take a quick look to make sure you have all the parts,nothing’s missing before assembly.)

We started with the extendable underframe, following the manual to match screw positions based on the desktop size.

Ours is the 180 cm (71") model, so we locked the screws on the outer slots.

Next, we secured the screws on both the outer, and inner sides.


Then assembled the support feet (Rear leg first). The screw holes are recessed, so take your time to align them correctly. Don’t forget to attach the adjustable foot pads underneath each leg.


Attach the (main) lifting leg to the extendable underframe.

From the box, you’ll also find a decorative wood trim — a glossy black ash veneer that attaches to the front legs.

The refined, furniture-grade finish is just as good as the tabletop. It’s subtle with a smooth, natural touch.

After that, it’s time to connect the lifting legs to the extendable underframe. This part can be a bit heavy, so it’s best done with a friend.

Finally, install the control box. Decide which side you prefer for your control panel — left or right — since the cable routing depends on it. This time, for Revon, we’ve updated the desk frame. The new U-shaped beam not only provides more stability but is also designed to neatly conceals all the cables inside it for a cleaner look.

Before moving on to the desktop, we attached the reinforcement brackets on both sides to keep the frame steady and balanced.
2. Unboxing the Desktop


Next up: the desktop!

This is the 180 × 80 cm (71" × 31") Ash Black version, and trust us, it’s heavy. Definitely a two-person job to carry it safely.

Place the desktop on top of the assembled frame. Along the back and sides, you’ll find pre-installed rail channels designed for cable trays and desk dividers. The bottom also has pre-drilled screw holes, so installing accessories later will be a breeze.

Following the instructions, we loosely inserted each screw first, don’t tighten them fully until all screws are in place, this ensures perfect alignment.

Once secured, we added the center support bar underneath. It’s not something you often see on standing desks, but it’s one of the little but essential features that Revon didn’t skip — it helps prevent long-term sagging of the desktop.

Finally, it’s done! Last but not least, the front edge features a soft ergonomic curve that lets your arms rest comfortably while working, a subtle detail that makes a big difference.
3. Cable Management Tray & DivMag Accessories

Here comes the fun part — cable management and Divmag accessories.

Let’s start with the cable management tray. All parts are neatly packed with protective foam.


We’re using the three-piece cable tray set; they're paired with two parts: the detachable divider (for added privacy and organization) and the tray itself.

Assembly is easy, simply align the tray’s rotating clips with the desktop’s rail and twist them in place. There’s also a protective film on the white surface; you can remove it if you prefer a matte finish.

The detachable divider connects to the cable tray through a clever sliding mechanism, lifts it up to detach, lower it down to lock it back in.

Once installed, there’s a small gap between the divider and the desktop for cables to pass through. Simple and tidy!

Now for the highlight: the DivMag magnetic accessories.

Each piece feels like a premium gadget, with solid construction and clean matte finishes. The full set includes:
DivMag Phone Holder
DivMag Zigzag Tray (x2)
DivMag Container (Small & Large)
DivMag Pen & Memo Holders (x3)
DivMag Cable Ties (x4)
Magnetic Cable Holders (x3)

Each cable tie pack includes four straps.

And the pen holders come in three finishes — silver, gray, and black.

The phone holder fits devices up to 7 inches.

…while the trays and containers are perfect for pens, notepads, or small gadgets.

We especially love the zigzag tray. It's great for holding your phone, glasses, or other daily essentials.

And because every DivMag piece is magnetic, you can even attach them to your PC case or other metal surfaces.


One of our favorite features: the control panel is also magnetic, so you can place it wherever feels most comfortable, it never gets in your way!!
Final Thoughts
That’s our full unboxing and assembly experience with the Revon Elite standing desk! The manual is detailed, the process is straightforward, and the overall build quality really shows Dezctop’s craftsmanship.
If you’re assembling by yourself, take it slow, double-check your alignments, and you’ll have it up and running in no time. And of course, if you run into any questions, we’re always just a message away!
Ready to Create Your Perfect Setup?
Explore the full Revon Series and the complete range of DivMag Accessories to make your workspace as organized and inspiring as possible.
Tag








Dezctop